
BASIC AERONAUTICS 101
The Scott
Sled Kite
INGREDIENTS:
2 to 4mm-thick plastic tarp in a bright color
Three 1/8" wooden dowels, each 3' long
Roll of 2" clear plastic packaging tape
Some cloth tape
6' pieces of 6- or 8-lb monofilament fishing line
Small fishing swivel
Small grommet tool and two grommets
Yardstick
Single-edge razor blade of Xacto knife
Permanent marker pen
|
The Scott Sled Kite flies well in light breezes as long as the line is kept taut.
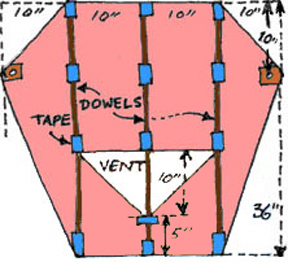
Spread the tarp out on the floor. Use the marker and yardstick to indicate a 40" x 36" rectangle. On the rectangle's long sides, mark off four 10" sections. On the short sides, make a mark 10" from the corners as shown in the diagram.
Cut out the 40" by 36" rectangle with the razor blade and yardstick.
Using the 10" marks as guides, cut off the corners of the rectangle. These cuts create the outline of the kite fabric. Take a look at the diagram before you start slashing away.
Cut out a triangular vent. Again, refer to the diagram for the correct location. This creates the final shape of the kite. What remains is to attach the kite fabric to the frame.
This frame makes the kite fabric stiff in one direction, but flexible in the other.
Take the three wooden dowels and lay them vertically on the plastic surface 10" apart.
Cut small, equal sections of the plastic packing tape to fix the ends of the dowels to the edges of the kite fabric. Wrapping the tape over the edge will create a strong sleeve where the end of the dowel can sit securely.
Attach the dowels to the rest of the kite fabric with more sections of tape. Refer to the diagram to ensure correct placement. Go to the bottom of the triangular vent and tape the dowel to the fabric there, as well.
The bridle attaches to the outermost edges of the kite fabric (where the corner cuts were made). Before attaching the bridle itself, you'll reinforce the points where the bridle is attached to the kite fabric.
Put squares of cloth tape on both of the outermost edges of the kite fabric. Consult the diagram for optimum placement. Trim the tape to match the contour of the plastic edge.
Use the small grommet tool to place a grommet a half-inch in from edge of the fabric, where it forms the "point" on both side flaps.
Take the 6' piece of fishing line and fold it in half to find the center. Mark the centerpoint. Tie the swivel into the line at the centerpoint with an overhand knot.
Thread each end of the fishing line through each of the grommets. Loop this end around to the front and tie it off, Include the side of the fabric in the tie-off. Your bridle is now formed, and your kite is finished! Attach your kite line to the swivel in the middle of the bridle, and go find some wind!
|
